Tuesday, January 31, 2017

Katharine Hepburn’s Brownies


When asked to name the heroes in my life, Katharine Hepburn is on my list. My admiration of her talent started when I was a teenager and dreamed of being an actress. I loved her work, especially in two of my favorite movies, "On Golden Pond" and "Desk Set".


As I got older, I started to admire Katharine Hepburn, the person. I liked her spunky, straight-forward attitude. I loved that she would only wear pants because she didn’t like dresses. She was strong, smart, talented, and witty. I want to be just like her.

(I highly recommend reading her autobiography, Me. As you’re reading the book, you can hear her voice in the words.)

With all the upheaval going on in the world right now, I thought we could all use some chocolate. This brownie recipe came from a New York Times letter to the editor. It’s a sweet story about the writer’s encounter with Miss Hepburn, who lived near her family’s Connecticut home.  (You can read the story here.) Besides learning life lessons from the actress, the writer also learned her key to delicious brownies: Do not use too much flour! Notice the recipe only calls for a quarter of a cup.

I made two small changes to the original recipe. First, I added a bit of instant espresso powder, since I find it enhances the chocolate flavor in any recipe. Second, I baked the brownies in a 9-inch-square baking dish instead of the 8-inch one called for in the recipe because, well, I didn’t have an 8-inch one. I shortened the baking time a bit.

That is the key to this dish…do not over bake. These brownies are supposed to be fudgy and gooey.

This is an easy, make-any-time recipe since it contains ingredients most of us keep in our pantry. The resulting brownie is a chocoholic's fantasy. 

Katharine Hepburn’s Brownies
Serves 12

1/2 cup cocoa powder
1 stick (1/2 cup) unsalted butter
1 cup sugar
1/4 cup flour
1 cup chopped walnuts
Pinch of salt
2 large eggs
1 teaspoon vanilla
1/8 teaspoon instant espresso powder

Preheat the oven to 325 degrees F. Spray an 8-inch-square or 9-inch-square baking dish with non-stick cooking spray and set aside until needed.

Put the cocoa powder and butter into a large microwave-safe bowl. Place in the microwave for about 1 minute, or until the butter is melted. Whisk the mixture together until smooth. Set aside to cool a bit.

In a small bowl, mix together the sugar, flour, walnuts and salt. Set aside.

When the butter-cocoa mixture has cooled slightly, whisk in the eggs, one at a time. Then whisk in the vanilla and espresso powder.

Pour the sugar-flour mixture into the cocoa mixture. Stir until just combined. Don’t over mix. Pour the batter into the prepared baking dish. Bake the 8-inch-square pan for 30 to 35 minutes, and the 9-inch-square pan for 20 to 25 minutes. Do not over bake. The brownies are supposed to be fudgy and gooey.

Remove the brownies from the oven and place on a cooling rack to cool completely before cutting.


Sunday, January 15, 2017

Homemade Hot Cocoa Mix


Sometimes you just need chocolate.

I’m in the midst of a January letdown. Like many people, I feel this way after the excitement and joy of the holidays. I wait all year for September to arrive, and my heart dances a little jig when the weather turns crisp, and the celebrations roll through Halloween, Thanksgiving, Christmas, my birthday, and the New Year.

In some ways, January is a relief…a time to relax and recharge. However, this year started with a sinus infection. Plus, the Kansas weather can’t decide what season is the current one. We’ve had a couple of days with snow, but we’ve also had temperatures reach the 60s. This weekend, we were all prepared for a dangerous ice storm, and while there were a few incidents of ice around, the ice apocalypse transformed into a dreary, foggy, chilly, rainy day.

My go-to comfort drink when I want something warm is a nice cup of hot tea. But on days like today, the warming drink has to be hot cocoa.

I saw this Alton Brown recipe online and was attracted by the idea of having a hot cocoa mix ready to go without all of the chemicals found in the store-bought mixes. 

Wednesday, January 11, 2017

Hot Pizza Dip


I love gathering people together to enjoy food and football! Hot Pizza Dip is one of my favorite dishes to serve to guests because I love pizza, and it’s easy to make. You can top it with your favorite pizza add-ins. 

Mine are green peppers, onions, black olives, and pepperoni. Also, you can bake it in any 9- to 10-inch dish, but I used my cast iron skillet because it holds the heat, so the dip stays warm longer.


I take the skillet straight from the oven and onto the middle of the table. That way, everyone can gather around and scoop the gooey goodness straight from the pan with a toasted piece of a baguette, or they can spoon some onto individual dishes and dip from there.


However you choose to serve this dip, the key is to have everyone enjoying the food and time together. Add some favorite beverages—and a terrific batch of brownies (stay tuned!)—and you’ll have a party…no reason required!


***Hey, thanks for reading! If you've enjoyed my posts or tried one of my recipes, you can support my writing efforts through Buy Me a Coffee...or tea...or flavored fizzy water. Your donation will be greatly appreciated, especially now as I deal with a chronic autoimmune disease that flared back up again. The button is located on the right-hand side of this page, or you can follow the link here. If you can't donate, that's okay, too. Either way, thank you so much for reading my stuff!  

Wednesday, January 4, 2017

Slow Cooker Meatballs for #National Spaghetti Day


You know I’m a fan of making your own pasta sauce. For years, I've preached encouraged home cooks to step away from the jar. I even posted this terrific recipe from Marcella Hazen that I use all the time.


However, life has a funny way of making us change our minds. In September, I started working as a reading paraprofessional at a local middle school. I love helping kids improve their reading levels before they head on to high school, but spending all day at school and then a few hours each evening and weekends writing doesn’t leave much time for making and freezing pasta sauce. Most of my cooking time is filled with developing recipes for articles and this blog.


I caved and went back to using the jarred sauce. Then the Ragu folks offered to send me a couple of jars of their Homestyle Four Cheese sauce to try for National Spaghetti Day (today!), and I couldn’t resist.

The sauce was the perfect excuse to test out this Slow Cooker Meatballs recipe, which I first saw on the Kitchn website. The original recipe makes its own sauce, but I decided to use the Ragu to make it even easier.


The meatballs can be made the night before and kept in the refrigerator. What really intrigued me about the recipe was I didn’t have to fry or bake the meatballs first! I just added them to the sauce. So easy!

The meatballs were tender and flavorful. A couple broke apart into the sauce while it cooked, but that just made it more of a meat sauce. And while the Ragu sauce tastes great on its own, the simmering meatballs added a rich, savory flavor to the sauce.

I enjoyed the meatballs and sauce on spaghetti last night. Today I plan to make a meatball sub sandwich. I’ll also freeze some of the leftovers for a busy weeknight meal.


Slow Cooker Meatballs
Adapted from recipe found on the Kitchn
Makes about 24 meatballs

1/2 cup whole milk
1/2 cup Italian-seasoned bread crumbs
1 large egg
1 teaspoon kosher salt
1/2 cup freshly grated Parmigiano-Reggiano cheese
1/4 cup finely chopped flat-leaf parsley
1 pound ground beef
1/2 large onion, finely diced
1 clove garlic, finely minced
2 jars pasta sauce (I used Ragu Homestyle Four Cheese sauce)

Pour the milk into a measuring cup, and then stir in the bread crumbs. Set aside.
In a large bowl, whisk together the egg, salt, cheese and parsley. Add the ground beef, diced onion and minced garlic. Using your hands, mix everything together but try not to overwork the mixture.

Using a tablespoon-sized scoop, (or you can just pinch off the amount you need) scoop out 24 meatballs onto a waxed paper-lined baking sheet. Roll each mound into balls.

Into a large (6-quart or bigger) slow cooker, pour in the pasta sauce. Place the meatballs one at a time into the sauce. Use a spoon to make sure the sauce covers the meatballs. Cover and cook on low 4 to 6 hours until the meatballs are done. Some of the fat from the meatballs will float to the top. Just stir it back into the sauce. (Trust me. It’s delicious!)


Disclaimer: The Ragu Company graciously sent me two jars of their sauce, but they did not pay me to make this post. All the opinions expressed are my own.

Sunday, November 6, 2016

Rosemary Garlic Beer Bread


I can’t believe Thanksgiving is less than three weeks away. I think part of my disconnect with the season is the unusually warm weather we’ve had so far this fall. Temperatures in the 80s make it hard to enjoy autumn when what I really want to do is wear sweaters, scrape frost, and kick leaves. Luckily the forecast for the upcoming weeks says cooler weather has arrived.


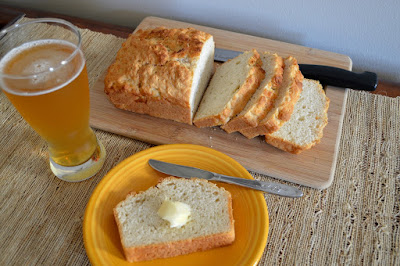
If you’re looking for delicious but easy recipes for Turkey Day, I’d like to recommend this Rosemary Garlic Beer Bread. The dough can be mixed and in the oven in about five minutes! And the beer in this recipe gives the bread a yeast-like flavor without the waiting time of more traditional yeast bread recipes.


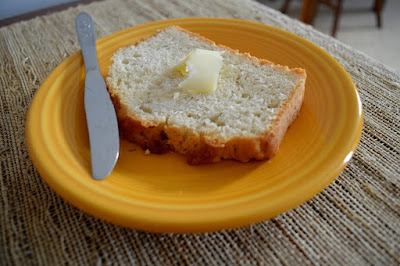
The resulting loaf is tender, dense, and flavorful. Feel free to leave out the rosemary and garlic powder if you prefer basic bread. Warm slices taste wonderful slathered with butter, but this bread will also work for those leftover turkey sandwiches
or toasted for breakfast.


Yield: 1 loaf
Author: Linda Ditch
Rosemary Garlic Beer Bread

Rosemary Garlic Beer Bread

Bread with a yeast-like flavor without the waiting time.

Ingredients

  • 3 cups self-rising flour
  • 1 tablespoon sugar
  • 1 teaspoon dried crushed rosemary
  • 1 teaspoon garlic powder
  • 4 tablespoons melted unsalted butter, divided
  • 12 ounces beer

Instructions

  1. Preheat the oven to 375 degrees F. Spray a 9- x 5-inch loaf pan with non-stick cooking spray. Set aside.
  2. In a large bowl, whisk together the flour, sugar, rosemary, and garlic powder. Pour in 3 tablespoons of the melted butter and the beer. Stir together until combined. (It will not be completely smooth.) Spoon the batter into the prepared loaf pan. Pour the remaining 1 tablespoon of melted butter over the top.
  3. Bake for 45 to 50 minutes, or until an inserted toothpick comes out clean. Remove from the oven and allow to cool in the pan for 5 minutes. Turn out onto a cooling rack and cool completely before cutting.

Tuesday, October 18, 2016

Cinnamon-Pumpkin Muffins


I’m never happier than when I find a new mystery series to read, especially if recipes are included. Krista Davis’s Domestic Diva series is one of my favorites, and I’ve shared a couple of recipes in the past from her books. So it made sense to try her Paws and Claws series.

I read the first chapter of Murder, She Barked while standing in the bookstore! This series is set in the town of Wagtail, Virginia, which as the name suggests, is a very pet-friendly place. Holly Miller’s grandmother owns the Sugar Maple Inn, where guests and their pets are welcomed. Add a few unique characters, plus a murder or two, and you’re in for a fun visit.

As with Davis’s other series, this one offers lots of recipes at the book's end. For pet owners, there are recipes specifically for our furry friends.

With it being autumn, I gravitated towards this people-friendly Cinnamon-Pumpkin Muffin recipe. My favorite flavor and a fall flavor classic mixed together. How could I go wrong? The recipe is easy to mix up and tastes amazing! I enjoyed it with both my morning coffee and afternoon tea, and I think it would make a nice Thanksgiving breakfast.

Now I'm off to get book 2 in the series.

Yield: 12 muffins
Author: Linda Ditch
Cinnamon-Pumpkin Muffins

Cinnamon-Pumpkin Muffins

Adapted from a recipe found in the book Murder, She Barked by Krista Davis.

Ingredients

  • 1 1/2 cups flour
  • 1 teaspoon baking powder
  • 1 teaspoon baking soda
  • 1/2 teaspoon salt
  • 1 teaspoon cinnamon
  • 2 eggs at room temperature
  • 1/2 cup oil
  • 1/2 cup packed dark brown sugar
  • 1/4 cup granulated sugar
  • 3/4 cup pumpkin puree
  • Topping
  • 1/4 cup packed dark brown sugar
  • 2 teaspoons cinnamon

Instructions

  1. Preheat the oven to 350 degrees F. Line a muffin tin with paper cupcake cups. Set aside.
  2. In a large bowl, whisk together the flour, baking powder, baking soda, salt and 1 teaspoon cinnamon. Set aside.
  3. In a small bowl, whisk together the eggs, vegetable oil, 1/2 cup dark brown sugar, granulated sugar, and pumpkin until well blended. Pour the mixture into the flour mixture and stir until just blended. Be sure to not overmix.
  4. In a small bowl, mix together the topping ingredients. Spoon the muffin batter into the muffin tin until the cups are almost full. Sprinkle a teaspoon of the topping mixture on top of each muffin cup. Using a toothpick or a bamboo skewer, swirl the topping into the top of the muffin.
  5. Place the muffin tin into the oven and bake for 15 to 20 minutes, or until a toothpick inserted into a muffin comes out clean.
Created using The Recipes Generator

Monday, October 10, 2016

Winsor Farms Cornbread from Kansas #FarmFoodTour


Recently, I packed my bags and joined a group of bloggers, dietitians, and farmers on a #farmfoodtour sponsored by the Kansas Farm Bureau and the Kansas Soybean Commission. We spent three days traveling across Kansas to see where a big chunk of the world’s food is produced.


I met pigs…


Lots of pigs…


I met cows…


Lots of cows…


Did I mention LOTS of cows…


Plus a few horses...


And I saw fields of grain…


...most ready for harvest.

I grew up visiting my grandparents’ farm in Missouri, so farming is a lifestyle I’m familiar with. However, my family farm is tiny when compared to the ones I saw on this trip, with their thousands of acres and hundreds of livestock...


...and I learned that size doesn’t matter. Those huge operations are still “family farms.” Many have been in the same family for generations, and now they not only support that family but also the families of their employees. Yes, they are managed like a business, but my grandfather did the same thing, just on a smaller scale. His business savvy assured my grandmother a comfortable life after he passed away and continues to support my mom today.


On the final evening of our trip, we arrived at Winsor Family Farm in Grantville, Kansas, while they were in the midst of the corn harvest. Our bus pulled up in time to see the golden grains being loaded into huge bags to store until they could be hauled to the local grain elevator and sold.


Kids love to play on the bags.


The Winsor family joined us in the field, where we had a boxed supper as the sun set on a chilly autumn evening.


The family talked with passion and pride about their farm operation.


Stories and laughter were shared.

And LaVell Winsor, who had traveled with us on our journey, gave us each a gift bag before we left.


The gift contained a bag each of cornmeal and flour, along with the family’s cornbread recipe. It said, “This was LaVell’s great-grandma’s recipe and is a family favorite. She would have made this using bacon grease. In modern times, we use vegetable oil, which is crushed from soybeans which we raise on our farm.”


I mixed up a batch, and this is now my favorite cornbread recipe! It is light, tender, and tasty. Those of you who are fans of the mix in the blue and white box need to try this recipe. It tastes just like it and is just as easy to make. (If sweet corn bread is not to your liking, just cut back a bit on the sugar.)

Stay tuned for more blog posts featuring recipes I picked up on the tour.


 With the cool weather settling in and the holidays around the corner, I thought this cornbread was a good place to start.

Winsor Farms Cornbread

1 cup sugar (or to taste)
1 cup flour
1 cup cornmeal
1 1/2 teaspoons baking powder
1/2 teaspoon salt
1 cup whole milk
1/2 cup vegetable oil
2 eggs

Preheat the oven to 350 degrees F. Grease an 8- x 8-inch baking dish. (I used non-stick cooking
spray.) Set aside.

In a large bowl, whisk together the sugar, flour, cornmeal, baking powder and salt. In a large measuring cup, whisk together the milk, vegetable oil, and eggs. Mix the wet ingredients into the dry ingredients, and then pour the mixture into the prepared baking dish. Bake for 25 to 30 minutes, or until the cornbread is golden brown and a tester inserted in the center comes out clean.


Disclaimer: The #FarmFoodTour was sponsored by the Kansas Farm Bureau and the Kansas Soybean Commission, who paid for all of my travel expenses and compensated me for this post. However, my writings, views, opinions, thoughts, and cravings are entirely my own.  


Thursday, September 22, 2016

Apricot Pecan Oatmeal Bars


I’ve mentioned before that I’m not much of a morning person. Once I’m up, I enjoy watching the sky lighten as I sip my coffee and work my way through the newspaper. I also feel more productive if I wake up early.

It’s just the getting up part that is difficult. I hate to leave my soft, cozy bed.

Recently, I’ve learned there is a 5 o’clock in the morning as well as the evening. A few weeks ago, I started a new job at a local middle school. I’m working in a program that helps students improve their reading skills…perfect for a writer who wants to encourage kids to enjoy reading as much as I do! Books have brought fun and joy to my life ever since I discovered The Boxcar Children in elementary school. Now I hope to pass that joy on to this generation.

The only obstacle is waking up in the mornings. I’m also not much for eating breakfast, which wasn’t a problem when I was working full-time from home and able to grab something from the kitchen whenever my stomach growled. Now, I head out the door at 7:15 a.m., so by 8:30 or 9, I start getting pretty hungry.


These Apricot Pecan Oatmeal Bars are a great solution. They are adapted from a video made by Ree Drummond—The Pioneer
Woman.


While her recipe sounded yummy, I wanted to up the nutrition level a bit more by adding pecans and some whole wheat flour. Her original recipe called for strawberry jam, which would taste great. But on Facebook, she suggested apricot, which is one of my favorites. You can use any flavor jam you like. Just make sure it’s jam, which is easier to spread than jelly. Also, if the jam is still a little stiff, try zapping the jar in the microwave for 10 seconds to warm it up a bit. Just don’t let it get too runny.


These bars are a tasty way to stave off hunger in the morning. Just put one (or two!) into a plastic bag and go!

Apricot Pecan Oatmeal Bars
Adapted from The Pioneer Woman recipe


1 cup all-purpose flour
1/2 cup whole wheat flour
1 1/2 cups quick oatmeal
1 cup packed brown sugar
1 teaspoon baking powder
1/4 teaspoon salt
14 tablespoons cold unsalted butter, cut into small pieces (plus more for the dish)
1 10-ounce jar (or larger) apricot jam
1/2 cup chopped pecans

Preheat the oven to 350 degrees F. Butter a 9 x 13 baking dish or spray with non-stick cooking spray. Set aside.

In a medium bowl, mix together the flours, oatmeal, brown sugar, baking powder, and salt. Using a pastry cutter, two knives, or your fingers, cut the butter into the mixture to make small, crumbly pieces. (The mixture will look like coarse, damp sand with bits of oatmeal.)

Pour half the mixture into the prepared baking dish. Using your fingers, pack the mixture firmly into the bottom of the dish to form a crust. Spoon the jam on top and gently spread it on the surface in an even layer.

Stir the pecans into the remaining oatmeal mixture. Spread the mixture over the top of the jam and press it down to form a crust.

Place the baking dish into the oven and bake for 35 to 40 minutes, until top is golden brown. Take out of the oven and allow to cool completely before cutting into squares.


Tuesday, August 9, 2016

Make-Your-Own Trail Mix


Does this happen to you: While working at your computer/reading an engaging novel/watching a favorite television program, you are attacked by the snack gremlins? It happens to me a lot! My stomach…or is it my brain…keep saying, “Wouldn’t a snack be nice right about now?”


What snacks do you reach for? If you’re anything like me, your choice isn’t always (i.e.: hardly ever) healthy. 

In an effort to correct that situation, I decided to buy a bag of trail mix. While looking at the vast variety of mixes on my grocery store shelves, I had a revelation: Most of the ingredients I like in a trail mix were already in my home pantry.

 
So I tossed together peanuts, walnuts, pistachios, dried cherries, dried cranberries, raisins,
and dried apricots. Then I added some dark chocolate chips…those are good for you, right?  Then I dumped the whole mixture into glass jars to keep on hand when the snack gremlins pay a visit.


What are your must-haves in a trail mix? 

Or do you have a different go-to snack?
Healthy or not?