Showing posts with label bread. Show all posts

Thursday, June 9, 2022

Muffuletta Sandwich Recipe


I love a good sandwich in the summertime. Sure, salads are great too, but I find a sandwich to have much more staying power, especially if I’m busy doing yard work, sightseeing, or just playing in the sunshine. Plus, a sandwich is much easier to transport for a picnic at the park, beach, or backyard.

Photo from Central Grocery
Have you ever heard of a muffuletta sandwich? It is an iconic New Orleans favorite created at Central Grocery and Deli. A muffuletta is filled with Italian cold cuts and cheese. The difference-maker is the olive salad, which is somewhat like a tapenade but chunkier. It’s a combo of olives, garlic, herbs, olive oil, and vinegar and gives the sandwich a complex flavor beyond the typical Italian sub.  


For me, the key component of a good sandwich is the bread. The traditional muffuletta bread is round and topped with sesame seeds. I used a delicious slow-fermented olive oil ciabatta from my recent Wildgrain box order. It was perfect—soft on the inside, crusty on the outside, and just the right amount of sourdough tang. (FYI: I have a terrific deal to share with you from Wildgrain! See the below!) 

You will want to make the muffuletta olive salad a day or more ahead, so the flavors have a chance to mix and mingle. Otherwise, a muffuletta is a snap to put together. I think the sandwich is even better the next day, so feel free to make it the day before and store it in the fridge. 


Now, for the Wildgrain deal mentioned above. If you follow me on social media, you know I’ve enjoyed all the wonderful items I received in my first box. Wildgrain is the first membership box that delivers bake-from-frozen sourdough breads, fresh pastas, and artisan pastries to your home. Everything bakes within 25 minutes (no thawing!) and are made with clean ingredients.


My box contained three different sourdough loaves of bread (including the ciabatta I used for this Muffuletta recipe), sourdough rolls, croissants, and two kinds of pasta. 


Here’s the deal, and it’s a big one: Follow this link to order your first Wildgrain box and use the promo code SUNFLOWERLIFE, and you’ll get $30 off your first order! (And I’ll get a small commission as well.) Not only are the breads delicious, but I love having them delivered right to my door. Especially since the nearest artisanal bread bakery to my home is a 30-minute drive. Give them a try! 


Monday, April 11, 2022

Foods at the Last Supper


As Christians worldwide enter Holy Week, our thoughts turn to those last days of Jesus’s life. Have you ever wondered what was served at the Last Supper? Recently I taught a Sunday School class on the topic. We all know bread and wine made an appearance, which Christ transformed into the Holy Eucharist. But there was more food served at the meal.

Scholars debate about whether or not the Last Supper was a Passover Seder. While verses found in the gospels of Matthew, Mark, and Luke talk about the meal taking place on the first day of Unleavened Bread, the Book of John seems to depict the meal and Jesus’s crucifixion occurring before the start of Passover. 

The book The Origins of the Seder: The Passover Rite and Early Rabbinic Judaism, written by Baruch Bokser, says scholars disagree on the answer. It notes, “The current state of scholarship tends to argue against the identification of the Last Supper as a Seder.”

An article in The Jerusalem Post published on 4/13/2014 notes, "The truth may be that though the last supper took place shortly before Passover, it was not a seder at all but a talk-feast, a meeting of the fellowship – the havurah – which Jesus constituted with his disciples. The participants would have said the regular blessings over bread and wine, as well as the grace after meals, like devout Jews at any meal: important elements, to be sure, but on their own they do not add up to a Seder."

So, just what did Jesus and the disciples eat at the meal? In 2015, archaeologists Generoso Urciuoli and Marta Berogno released a study that concluded the Last Supper would have consisted of:

  • Cholent, a stew of beans, potatoes, and beef, is started on Friday afternoon and allowed to cook overnight to be eaten at noon on the Sabbath. Jews still eat versions of this today. (Check out this recipe from the New York Times.)
  • Bitter herbs, which symbolize the bitterness and harshness of the slavery that the Hebrews endured in Egypt.
  • Charoset, also known as haroseth, a chunky fruit and nut paste. 
  • Unleavened bread and wine, of course.

One thing missing was lamb. In 2007, Pope Benedict XV stated lamb was not served at the Last Supper since the meal took place before the ritual sacrifice of the paschal lambs. Jesus took the place of the lambs. This announcement lends credence to the idea the dinner wasn’t a Passover seder. 

There were two things about the Last Supper menu I found intriguing. One was the charoset. I saw many recipes online made with apples, but since only crabapples were common in the first-century Mediterranean area, I adapted a recipe made with dried fruit. Most also used Mederia or dry sherry, but I went with lemon juice. The result is a mixture similar to a chunky jam. It was a hit in my household! The charoset also tastes great on buttered toast and in peanut butter sandwiches.


I was also curious about unleavened bread. I know it is common for Jews to celebrate Passover with matzah (also spelled matzo and matza), an unleavened flatbread you can find in most grocery stores. However, I wanted to try making it myself.


The unleavened bread doesn’t have much flavor, which makes sense when you consider it was used in Jesus’s time as a utensil to scoop food out of bowls. It would be the perfect accompaniment to cholent, and it tasted great slathered with charoset. 


As we approach the Easter celebration, I hope this information brings more meaning and insight to your Holy Week devotions.  

Unleavened Bread

Serves 8

2 cups unbleached all-purpose flour

1 cup whole wheat flour

1 1/2 teaspoons salt

1 tablespoon olive oil

1 tablespoon honey

1 cup water

Add all of the ingredients into the bowl of a stand mixer. With the dough hook attachment, mix until the dough comes together and is kneaded until smooth, 4-6 minutes total. (Or knead together by hand until dough forms a smooth ball.) Wrap the dough ball in plastic wrap and allow it to rest for 30 minutes.

Divide the dough into 8 pieces. On a floured surface, roll each piece flat into an oblong shape that is 1/8 to 1/4-inches thick. When all the pieces are rolled out, cover with a clean kitchen towel so they don’t dry out.

Heat a non-stick skillet or griddle over medium-high heat. Place a flattened piece of dough into the hot skillet. Allow to cook until it starts to brown and puff up. Flip and brown the other side. Place on a rack to cool. 

Charoset

Serves 8

4 ounces raisins

4 ounces dried apricots, cut in half

4 ounces dried figs, cut in half

2 tablespoons honey

1 teaspoon cinnamon

2 teaspoons lemon juice (or Madeira or dry sherry)

Pinch of salt

3/4 cup chopped walnuts (almonds or pistachios also work)

Place the dried fruit into a medium bowl and cover it entirely with water. Allow the fruit to soak for at least 4 hours or overnight. Drain off the water and then place the fruit into a food processor. Add the remaining ingredients except for the walnuts. Pulse until the fruit is coarsely chopped. Add the nuts and pulse a few more times to combine. 

Store in an airtight container in the refrigerator. 


Thursday, January 13, 2022

Biblical Multigrain Bread


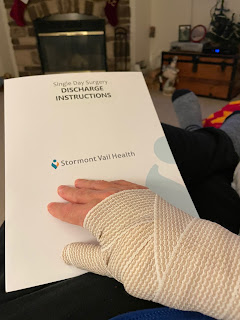
How’s 2022 treating you so far? Sorry I’ve been AWOL for the past few weeks. I had surgery on my wrist, which made cooking and writing a challenge. The wound has now healed and I’m ready to get back at it! 

In December, I taught an adult forum class at my church, Grace Episcopal Cathedral in Topeka, Kansas, on three essential foods of the first-century Mediterranean diet and how they tie into the holidays. The focus of week one was bread.


Do you still eat bread? I’ll be brave and admit I love it! Especially homemade, warm, and slathered with butter. Mmmm… But I know that bread is on many people’s do-not-consume list, with the low-carb craze still going strong. 

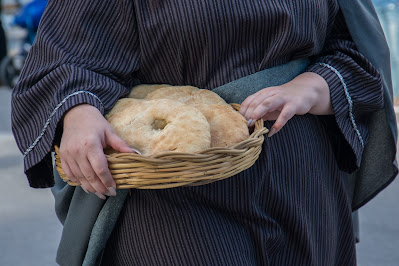
Did you know bread was a dietary mainstay during the time of Jesus? It was the most essential component of the first-century Mediterranean diet, made every day and served every meal. 

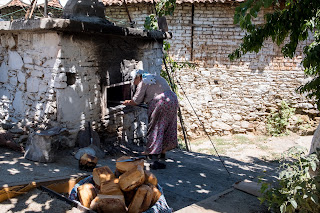
One person was assigned to bake the bread, usually a female family member or a slave in wealthy families. The bread baker would awaken well before everyone else. Her schedule went something like this:

1. Light the fire in the bread oven. 

2. Grind the wheat into flour. It would take three hours of grinding to make enough flour for bread for five to six people. 

3. Make the dough with a bit of dough saved from the day before for leavening, much like we do today with sourdough bread. 

4. Sweep out the coals from the oven, which at this point would be about 800 degrees. 

5. Bake the bread, saving some of the dough for the next day. 

Bread in that era was indeed the staff of life. Sometimes it was all the poor had to eat. As long as you had bread, you would be okay, which may be why the line in the Lord’s Prayer of “give us this day our daily bread” had such significance. When Jesus said, “I am the bread of life,” it was a powerful message to those listening.
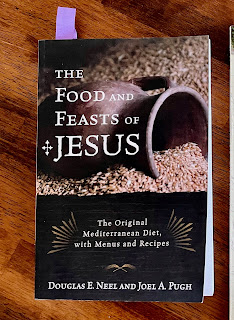

I used the book The Food and Feasts of Jesus by Douglas E. Neel and Joel A. Pugh for part of my research, and it includes a wonderful multigrain bread recipe. Instead of adding many different grains, the recipe uses Bob’s Red Mill’s 10 Grain Cereal. I ordered a package online, but you can often find it in natural food stores and some grocery stores.


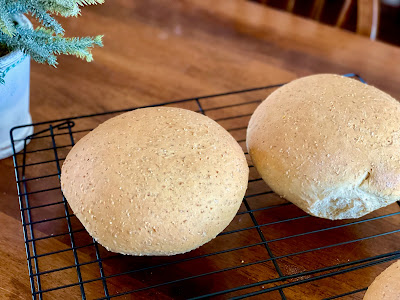
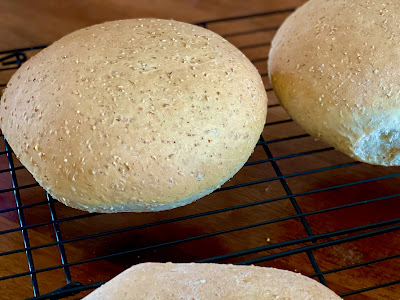
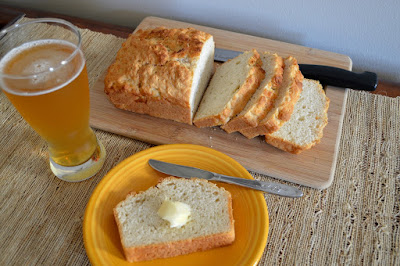
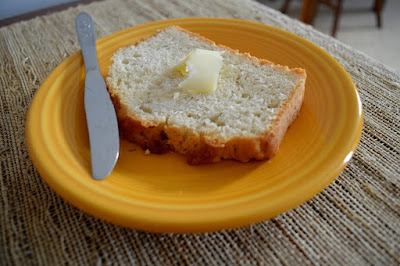
This bread was a big hit in my household, and the students from my class who made it gave it rave reviews. It’s an easy recipe since a mixer does most of the work. I enjoyed slices of this grainy bread with soup, for sandwiches, and toasted for breakfast. 


Biblical Multigrain Bread

Makes 4 small round loaves

1 tablespoon active dry yeast

1 1/2 cup warm water (approx. 110 degrees)

6 cups all-purpose flour

1 cup Bob’s Red Mill 10 Grain Cereal

1 tablespoon salt

2 tablespoons unsalted butter, soft or melted

2 tablespoons olive oil

1 1/2 tablespoons honey

1 cup whole milk

In the bowl of a mixer, place the yeast and warm water. Let stand for 15 minutes so activate the yeast. Then add the remaining ingredients.

Mix with a dough hook on low-medium speed for 5 minutes. Let the dough rest in the bowl for 15 minutes, and then mix again for another 5 minutes. The dough should be slightly sticky and springy. Add flour by the tablespoon if too wet, and water by the tablespoon is too dry.

Place the dough in an oiled bowl, turning it to coat the top with oil. Cover with a towel and set aside to rise until double in size, 1 to 1 1/2 hours. 

Once the dough has risen, turn it out onto a floured surface and punch down. Knead for about 1 minute, then divide the dough into 4 pieces. Shape into flat, round loaves about 6 to 8 inches in diameter and about 1 to 1 1/2 inches thick in the middle. Place the loaves onto baking sheets lined with parchment paper or lightly coated with non-stick cooking spray. Cover with floured towels and let rise for 1 hour. After 40 minutes, preheat the oven to 400 degrees.

Bake for 20 to 25 minutes, until the loaves are browned and sound hollow when tapped on the bottom. (You can also use an instant-read thermometer to check for doneness. The center of the bread should be 190 degrees F.) Place them on racks and allow them to cool for at least 2 hours before slicing. 


Friday, May 8, 2020

Crispy Cheesy Pan Pizza from King Arthur Flour


Weekends were made for pizza.


At the end of a long week, pizza is a tasty and comforting way to start the weekend, even if our workweek is spent in a home office or teaching and entertaining your kids.


While takeout from at your favorite local pizzeria is an option—one I take advantage of all the time!—making homemade pizza is also fun and satisfying. An added bonus is you have kitchen clean-up time while the pie bakes, so once dinner is served you can relax.


I’ve posted my favorite homemade pizza recipe before, but I think this one is the winner! I first saw it on the Food 52 website, with this great video on how to make it.


The original recipe is from the King Arthur Four folks. (Find it here.) What I love most about this pizza is the focaccia-like crust. The dough needs to rest in the refrigerator for 12 to 72 hours, which means you can mix it up when you have a free moment and then let it hang out for a couple of days until you need it. In fact, the longer it’s in the fridge, the more flavor it develops.


I used a store brand part-skim mozzarella, along with some grated Parmigiano-Reggiano. The sauce was a can of Hunts Tomato Sauce

with Basil, Garlic and Oregano I had in my pantry.


The result was a seriously delicious pizza with a crunchy, browned bottom and a crispy, cheesy edge around the top. 


This is now my number one pizza to make!


Sunday, November 6, 2016

Rosemary Garlic Beer Bread


I can’t believe Thanksgiving is less than three weeks away. I think part of my disconnect with the season is the unusually warm weather we’ve had so far this fall. Temperatures in the 80s make it hard to enjoy autumn when what I really want to do is wear sweaters, scrape frost, and kick leaves. Luckily the forecast for the upcoming weeks says cooler weather has arrived.


If you’re looking for delicious but easy recipes for Turkey Day, I’d like to recommend this Rosemary Garlic Beer Bread. The dough can be mixed and in the oven in about five minutes! And the beer in this recipe gives the bread a yeast-like flavor without the waiting time of more traditional yeast bread recipes.


The resulting loaf is tender, dense, and flavorful. Feel free to leave out the rosemary and garlic powder if you prefer basic bread. Warm slices taste wonderful slathered with butter, but this bread will also work for those leftover turkey sandwiches
or toasted for breakfast.


Yield: 1 loaf
Author: Linda Ditch
Rosemary Garlic Beer Bread

Rosemary Garlic Beer Bread

Bread with a yeast-like flavor without the waiting time.

Ingredients

  • 3 cups self-rising flour
  • 1 tablespoon sugar
  • 1 teaspoon dried crushed rosemary
  • 1 teaspoon garlic powder
  • 4 tablespoons melted unsalted butter, divided
  • 12 ounces beer

Instructions

  1. Preheat the oven to 375 degrees F. Spray a 9- x 5-inch loaf pan with non-stick cooking spray. Set aside.
  2. In a large bowl, whisk together the flour, sugar, rosemary, and garlic powder. Pour in 3 tablespoons of the melted butter and the beer. Stir together until combined. (It will not be completely smooth.) Spoon the batter into the prepared loaf pan. Pour the remaining 1 tablespoon of melted butter over the top.
  3. Bake for 45 to 50 minutes, or until an inserted toothpick comes out clean. Remove from the oven and allow to cool in the pan for 5 minutes. Turn out onto a cooling rack and cool completely before cutting.

Wednesday, September 24, 2014

Apple Raisin Soda Bread


This is my new favorite soda bread. I adapted this recipe a few weeks ago from one I found in The Apple Lover’s Cookbook by Amy Traverso.  I serve it cut into wedges, much like a scone. Be sure to use a tart apple when making this bread, such as a Granny Smith.

Yield: 1 loaf
Author: Linda Ditch
Apple Raisin Soda Bread

Apple Raisin Soda Bread

Adapted from The Apple Lover’s Cookbook by Amy Traverso

Ingredients

  • 2 1/4 cups all-purpose flour
  • 1/4 cup sugar, plus additional for the top
  • 1 1/2 teaspoons baking powder
  • 1 teaspoon salt
  • 1/4 teaspoon baking soda
  • 4 tablespoons melted butter
  • 1 cup buttermilk (or whole milk with 1 tablespoon of vinegar added)
  • 1 large Granny Smith apple, peeled and cut into small dice
  • 1/2 cup raisins
  • 1 teaspoon caraway seeds

Instructions

  1. Preheat the oven to 375 degrees F. Spray a 9-inch cake pan with non-stick cooking spray. Set aside. If you haven’t already done so, melt the butter and set it aside. Also, if you are substituting the milk-vinegar mixture for buttermilk, you will want to add the vinegar to the milk now and set it aside. Before using, remove 1 tablespoon of the milk mixture to create the correct measurement.
  2. In a large bowl, blend together with a whisk the flour, sugar, baking powder, salt, and baking soda. Pour in the melted butter and mix with a spoon until the butter is well distributed throughout the flour mixture. Make a well in the middle of the flour mixture and pour in the buttermilk. Fold the milk into the flour mixture until it is just combined. Fold in the apples, raisins, and caraway seeds.
  3. The mixture will be very sticky. Flour your hands and shape the dough into a ball, and then place it in the prepared cake pan. Flatten it slightly, but not so much that it fills the pan. The dough should not reach the edge of the pan. Sprinkle the top with 2 teaspoons of sugar.
  4. Bake for 45 to 50 minutes, or until the top is browned and a toothpick inserted in the center comes out clean. Cool the bread in the pan on a rack for 15 minutes, and then remove the bread onto the rack to cool for at least another 15 minutes.
Created using The Recipes Generator

Thursday, March 14, 2013

Ballymaloe Brown Bread


I spent the past week visiting a lovely, small hotel on the rugged western coast of Ireland.

Unfortunately, it was all in my imagination. 

That is the setting for Maeve Binchy’s new novel, A Week in Winter. Visitors to the Stone House hotel in fictional Stoneybridge, Ireland find renewal for their troubled souls and an optimistic vision for the future within its restful walls and along the wild Atlantic coast. All of Ms. Binchy’s books are warm, comforting and intriguing, and I love the way she brings characters from previous books into her latest novel. Sadly, Ms. Binchy passed away in July, 2012. I guess I’ll just have to go back to her first novel and read through them all again!

When I finished A Week in Winter, I didn’t want to leave Stone House, especially it’s large, warm kitchen where everyone gathers for breakfast and dinner. I decided to cook-up a food item served in the book, and the one that stood out for me was brown bread. I’ve made Irish soda bread many times, but never this one. So, with St. Patrick’s Day fast approaching, I decided to give it a try.

In my research, I found a lot of brown bread recipes were very similar to soda bread, with the addition of whole wheat flour, wheat germ and molasses (or black treacle). Then I came across this one for a yeast brown bread from the famous Ballymaloe House Hotel and Cookery School in County Cork, Ireland. (It’s at the top of my bucket list of places to visit before I die.) Since I had great success with their orange marmalade tea cake I made last year, I decided to give it a try.


This recipe, adapted from both Epicurious and Ballymaloe Cookery School versions, is so simple:  No kneading! Only one rise! Just five ingredients! Don’t expect a fluffy, soft wheat bread like we have here in the U.S. This brown bread is dense, but also moist. It is perfect cut into thin slices and spread with good, real butter. I also liked it with honey and jam, as well as served with a good Irish cheddar.


Yield: 1 loaf
Author: Linda Ditch
Ballymaloe Brown Bread

Ballymaloe Brown Bread

This brown bread is perfect cut into thin slices and spread with good, real butter. It is also lovely spread with honey and jam, as well as served with a good Irish cheddar.

Ingredients

  • 3 1/2 teaspoons dry yeast
  • 1 1/2 to 1 3/4 cup warm water (just over body temperature)
  • 1 teaspoon molasses or black treacle
  • 3 1/2 cups whole wheat flour (I used King Arthur)
  • 2 teaspoons salt

Instructions

  1. Spray an 8 by 5-inch loaf pan with non-stick spray, or grease well with oil. Set aside.
  2. Pour 3/4 cup of warm water into a small bowl. Sprinkle the yeast on top and allow it to sit for 5 minutes. Stir to dissolve the yeast, add the molasses, and leave for another 10 minutes. The yeast will become frothy. Add another 3/4 cup of warm water and stir to combine.
  3. In a large bowl, whisk together the whole wheat flour and salt. Make a well in the middle of the flour and pour in the yeast/water mixture. With a wooden spoon (or your hands) mix the flour and water together. Add more water if necessary. The dough should still be wet and sticky—too sticky to knead—but come away somewhat from the sides of the bowl.
  4. Place the dough into the loaf pan, cover with a towel, and allow to rise until the dough just reaches the top of the loaf pan, about 20 to 25 minutes. Preheat the oven to 425 degrees while you wait.
  5. When the dough has risen enough, bake for 30 minutes. Then lower the oven temperature to 400 degrees and bake for another 15 minutes. Turn the almost-done bread out onto a baking sheet and bake, upside down, for another 5 to 10 minutes so the outside crisps up. The bread is done when it sounds hollow when you tap on the bottom, or when the internal temperature reaches 200 degrees. Cool on a wire rack.
Created using The Recipes Generator

Monday, October 1, 2012

Wheat Bread and a Change of Plans


He changed his mind.

In the early morning hours on the day my husband, The Picky Eater, was to have quadruple bypass surgery, he pulled me close in the darkened hospital room and quietly said, “I don’t think surgery is the right thing for me. I want to try something else first. And I need you to stand by my decision.”

At first, I thought my sweetheart was just afraid, but it soon became clear he truly believed deep down inside that surgery wasn’t the right path for him to take. So we broke the news to nurses, doctors, family, and friends. After a lot of shocked reactions and serious discussions, everyone rallied around him and came up with a new plan. He hasn’t ruled out surgery completely, but for now, we are trying new medicines and diet changes to keep his heart as strong as possible.

So instead of spending Friday waiting for word from the operating room and giving comfort in the intensive care unit, we came home to begin adjusting to our new “normal” life. Our daily activities are the same as before this hospital stay, but now there is always that small realization in the back of my mind that something is different.

I’m trying very hard not to be a hovering, worrisome, nagging wife…but sometimes I can’t help it. As each day passes, my stress level lessens as I learn to turn my worries over to God, since He’s the one ultimately in charge.

Thank you to everyone who sent get-well wishes and support on this blog and also through Facebook and Twitter. I can’t tell you how much your thoughts meant to me.

On our first full day home from the hospital, I made wheat bread. There is something comforting in the process of mixing flour, yeast, and water together to create this basic dietary staple. Since I find kneading dough by hand stressful (I never seem to get it right!), I let my handy-dandy Kitchen Aid mixer do the work.

As the smell of baking bread filled our apartment, my anxiety was quietly replaced with a sense of home and well-being. And The Picky Eater liked it!

Everything will be okay.


Yield: 2 loaves
Author: Linda Ditch
Wheat Bread

Wheat Bread

A basic, delicious wheat bread adapted from a recipe that came with my Kitchen Aid mixer.

Ingredients

  • 1/2 cup fat-free milk
  • 3 tablespoons honey
  • 2 teaspoons kosher salt
  • 3 tablespoons unsalted butter
  • 2 packages active dry yeast
  • 1 1/2 cups warm water (about 110 degrees, or just warm to the touch)
  • 2 cups whole wheat flour
  • 3 to 4 cups all-purpose flour

Instructions

  1. In a small saucepan, heat the milk, honey, salt, and butter just until the butter has melted and the honey and salt are dissolved. Set aside.
  2. In the bowl of the mixer, dissolve the yeast in the warm water. Add the whole wheat flour and 2 1/2 cups of all-purpose flour. Add the milk-butter mixture. Mix with the dough hook on speed 2 for about 1 minute.
  3. With the mixer still running, add the remaining flour 1/2 cup at a time until the dough is cleaned from the sides of the mixing bowl and clings to the dough hook, about 2 minutes. Continue to mix for an additional 2 minutes to knead the dough. When finished, the dough should be smooth and slightly sticky to the touch.
  4. Place the dough in a greased bowl, making sure to grease the top of the dough, and cover with a towel or plastic wrap. Place in a warm spot free from drafts to let the dough rise until doubled in bulk, about 1 hour. (I preheat my oven at 400 degrees for just 1 minute, shut it off, and place the bowl with the dough inside to rise.)
  5. After the dough has risen, punch it down and divide it in half. Roll out each half on a lightly floured surface into a 9- x 14-inch rectangle. Starting from the 9-inch side, roll the dough into a log. Pinch the seam to close and tuck under the sides. Place the dough, seam side down, into a greased loaf pan. Cover with a towel and allow the dough to rise again until doubled in bulk, about one hour.
  6. Place the loaf pans into a preheated 400-degree oven and bake until golden brown, 20 to 30 minutes. Remove the baked loves immediately from the pans and allow to cool on a wire rack.