Sunday, November 6, 2016

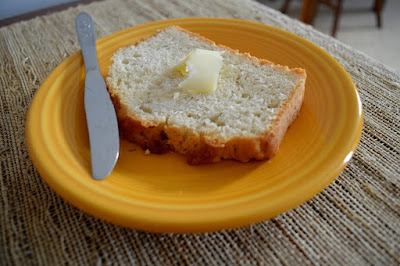
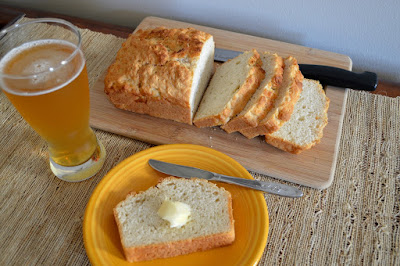
Rosemary Garlic Beer Bread


I can’t believe Thanksgiving is less than three weeks away. I think part of my disconnect with the season is the unusually warm weather we’ve had so far this fall. Temperatures in the 80s make it hard to enjoy autumn when what I really want to do is wear sweaters, scrape frost, and kick leaves. Luckily the forecast for the upcoming weeks says cooler weather has arrived.


If you’re looking for delicious but easy recipes for Turkey Day, I’d like to recommend this Rosemary Garlic Beer Bread. The dough can be mixed and in the oven in about five minutes! And the beer in this recipe gives the bread a yeast-like flavor without the waiting time of more traditional yeast bread recipes.


The resulting loaf is tender, dense, and flavorful. Feel free to leave out the rosemary and garlic powder if you prefer basic bread. Warm slices taste wonderful slathered with butter, but this bread will also work for those leftover turkey sandwiches
or toasted for breakfast.


Yield: 1 loaf
Author: Linda Ditch
Rosemary Garlic Beer Bread

Rosemary Garlic Beer Bread

Bread with a yeast-like flavor without the waiting time.

Ingredients

  • 3 cups self-rising flour
  • 1 tablespoon sugar
  • 1 teaspoon dried crushed rosemary
  • 1 teaspoon garlic powder
  • 4 tablespoons melted unsalted butter, divided
  • 12 ounces beer

Instructions

  1. Preheat the oven to 375 degrees F. Spray a 9- x 5-inch loaf pan with non-stick cooking spray. Set aside.
  2. In a large bowl, whisk together the flour, sugar, rosemary, and garlic powder. Pour in 3 tablespoons of the melted butter and the beer. Stir together until combined. (It will not be completely smooth.) Spoon the batter into the prepared loaf pan. Pour the remaining 1 tablespoon of melted butter over the top.
  3. Bake for 45 to 50 minutes, or until an inserted toothpick comes out clean. Remove from the oven and allow to cool in the pan for 5 minutes. Turn out onto a cooling rack and cool completely before cutting.
Tuesday, October 18, 2016

Cinnamon-Pumpkin Muffins


I’m never happier than when I find a new mystery series to read, especially if recipes are included. Krista Davis’s Domestic Diva series is one of my favorites, and I’ve shared a couple of recipes in the past from her books. So it made sense to try her Paws and Claws series.

I read the first chapter of Murder, She Barked while standing in the bookstore! This series is set in the town of Wagtail, Virginia, which as the name suggests, is a very pet-friendly place. Holly Miller’s grandmother owns the Sugar Maple Inn, where guests and their pets are welcomed. Add a few unique characters, plus a murder or two, and you’re in for a fun visit.

As with Davis’s other series, this one offers lots of recipes at the book's end. For pet owners, there are recipes specifically for our furry friends.

With it being autumn, I gravitated towards this people-friendly Cinnamon-Pumpkin Muffin recipe. My favorite flavor and a fall flavor classic mixed together. How could I go wrong? The recipe is easy to mix up and tastes amazing! I enjoyed it with both my morning coffee and afternoon tea, and I think it would make a nice Thanksgiving breakfast.

Now I'm off to get book 2 in the series.

Yield: 12 muffins
Author: Linda Ditch
Cinnamon-Pumpkin Muffins

Cinnamon-Pumpkin Muffins

Adapted from a recipe found in the book Murder, She Barked by Krista Davis.

Ingredients

  • 1 1/2 cups flour
  • 1 teaspoon baking powder
  • 1 teaspoon baking soda
  • 1/2 teaspoon salt
  • 1 teaspoon cinnamon
  • 2 eggs at room temperature
  • 1/2 cup oil
  • 1/2 cup packed dark brown sugar
  • 1/4 cup granulated sugar
  • 3/4 cup pumpkin puree
  • Topping
  • 1/4 cup packed dark brown sugar
  • 2 teaspoons cinnamon

Instructions

  1. Preheat the oven to 350 degrees F. Line a muffin tin with paper cupcake cups. Set aside.
  2. In a large bowl, whisk together the flour, baking powder, baking soda, salt and 1 teaspoon cinnamon. Set aside.
  3. In a small bowl, whisk together the eggs, vegetable oil, 1/2 cup dark brown sugar, granulated sugar, and pumpkin until well blended. Pour the mixture into the flour mixture and stir until just blended. Be sure to not overmix.
  4. In a small bowl, mix together the topping ingredients. Spoon the muffin batter into the muffin tin until the cups are almost full. Sprinkle a teaspoon of the topping mixture on top of each muffin cup. Using a toothpick or a bamboo skewer, swirl the topping into the top of the muffin.
  5. Place the muffin tin into the oven and bake for 15 to 20 minutes, or until a toothpick inserted into a muffin comes out clean.
Created using The Recipes Generator

Monday, October 10, 2016

Winsor Farms Cornbread from Kansas #FarmFoodTour


Recently, I packed my bags and joined a group of bloggers, dietitians, and farmers on a #farmfoodtour sponsored by the Kansas Farm Bureau and the Kansas Soybean Commission. We spent three days traveling across Kansas to see where a big chunk of the world’s food is produced.


I met pigs…


Lots of pigs…


I met cows…


Lots of cows…


Did I mention LOTS of cows…


Plus a few horses...


And I saw fields of grain…


...most ready for harvest.

I grew up visiting my grandparents’ farm in Missouri, so farming is a lifestyle I’m familiar with. However, my family farm is tiny when compared to the ones I saw on this trip, with their thousands of acres and hundreds of livestock...


...and I learned that size doesn’t matter. Those huge operations are still “family farms.” Many have been in the same family for generations, and now they not only support that family but also the families of their employees. Yes, they are managed like a business, but my grandfather did the same thing, just on a smaller scale. His business savvy assured my grandmother a comfortable life after he passed away and continues to support my mom today.


On the final evening of our trip, we arrived at Winsor Family Farm in Grantville, Kansas, while they were in the midst of the corn harvest. Our bus pulled up in time to see the golden grains being loaded into huge bags to store until they could be hauled to the local grain elevator and sold.


Kids love to play on the bags.


The Winsor family joined us in the field, where we had a boxed supper as the sun set on a chilly autumn evening.


The family talked with passion and pride about their farm operation.


Stories and laughter were shared.

And LaVell Winsor, who had traveled with us on our journey, gave us each a gift bag before we left.


The gift contained a bag each of cornmeal and flour, along with the family’s cornbread recipe. It said, “This was LaVell’s great-grandma’s recipe and is a family favorite. She would have made this using bacon grease. In modern times, we use vegetable oil, which is crushed from soybeans which we raise on our farm.”


I mixed up a batch, and this is now my favorite cornbread recipe! It is light, tender, and tasty. Those of you who are fans of the mix in the blue and white box need to try this recipe. It tastes just like it and is just as easy to make. (If sweet corn bread is not to your liking, just cut back a bit on the sugar.)

Stay tuned for more blog posts featuring recipes I picked up on the tour.


 With the cool weather settling in and the holidays around the corner, I thought this cornbread was a good place to start.

Winsor Farms Cornbread

1 cup sugar (or to taste)
1 cup flour
1 cup cornmeal
1 1/2 teaspoons baking powder
1/2 teaspoon salt
1 cup whole milk
1/2 cup vegetable oil
2 eggs

Preheat the oven to 350 degrees F. Grease an 8- x 8-inch baking dish. (I used non-stick cooking
spray.) Set aside.

In a large bowl, whisk together the sugar, flour, cornmeal, baking powder and salt. In a large measuring cup, whisk together the milk, vegetable oil, and eggs. Mix the wet ingredients into the dry ingredients, and then pour the mixture into the prepared baking dish. Bake for 25 to 30 minutes, or until the cornbread is golden brown and a tester inserted in the center comes out clean.


Disclaimer: The #FarmFoodTour was sponsored by the Kansas Farm Bureau and the Kansas Soybean Commission, who paid for all of my travel expenses and compensated me for this post. However, my writings, views, opinions, thoughts, and cravings are entirely my own.  


Thursday, September 22, 2016

Apricot Pecan Oatmeal Bars


I’ve mentioned before that I’m not much of a morning person. Once I’m up, I enjoy watching the sky lighten as I sip my coffee and work my way through the newspaper. I also feel more productive if I wake up early.

It’s just the getting up part that is difficult. I hate to leave my soft, cozy bed.

Recently, I’ve learned there is a 5 o’clock in the morning as well as the evening. A few weeks ago, I started a new job at a local middle school. I’m working in a program that helps students improve their reading skills…perfect for a writer who wants to encourage kids to enjoy reading as much as I do! Books have brought fun and joy to my life ever since I discovered The Boxcar Children in elementary school. Now I hope to pass that joy on to this generation.

The only obstacle is waking up in the mornings. I’m also not much for eating breakfast, which wasn’t a problem when I was working full-time from home and able to grab something from the kitchen whenever my stomach growled. Now, I head out the door at 7:15 a.m., so by 8:30 or 9, I start getting pretty hungry.


These Apricot Pecan Oatmeal Bars are a great solution. They are adapted from a video made by Ree Drummond—The Pioneer
Woman.


While her recipe sounded yummy, I wanted to up the nutrition level a bit more by adding pecans and some whole wheat flour. Her original recipe called for strawberry jam, which would taste great. But on Facebook, she suggested apricot, which is one of my favorites. You can use any flavor jam you like. Just make sure it’s jam, which is easier to spread than jelly. Also, if the jam is still a little stiff, try zapping the jar in the microwave for 10 seconds to warm it up a bit. Just don’t let it get too runny.


These bars are a tasty way to stave off hunger in the morning. Just put one (or two!) into a plastic bag and go!

Apricot Pecan Oatmeal Bars
Adapted from The Pioneer Woman recipe


1 cup all-purpose flour
1/2 cup whole wheat flour
1 1/2 cups quick oatmeal
1 cup packed brown sugar
1 teaspoon baking powder
1/4 teaspoon salt
14 tablespoons cold unsalted butter, cut into small pieces (plus more for the dish)
1 10-ounce jar (or larger) apricot jam
1/2 cup chopped pecans

Preheat the oven to 350 degrees F. Butter a 9 x 13 baking dish or spray with non-stick cooking spray. Set aside.

In a medium bowl, mix together the flours, oatmeal, brown sugar, baking powder, and salt. Using a pastry cutter, two knives, or your fingers, cut the butter into the mixture to make small, crumbly pieces. (The mixture will look like coarse, damp sand with bits of oatmeal.)

Pour half the mixture into the prepared baking dish. Using your fingers, pack the mixture firmly into the bottom of the dish to form a crust. Spoon the jam on top and gently spread it on the surface in an even layer.

Stir the pecans into the remaining oatmeal mixture. Spread the mixture over the top of the jam and press it down to form a crust.

Place the baking dish into the oven and bake for 35 to 40 minutes, until top is golden brown. Take out of the oven and allow to cool completely before cutting into squares.


Tuesday, August 9, 2016

Make-Your-Own Trail Mix


Does this happen to you: While working at your computer/reading an engaging novel/watching a favorite television program, you are attacked by the snack gremlins? It happens to me a lot! My stomach…or is it my brain…keep saying, “Wouldn’t a snack be nice right about now?”


What snacks do you reach for? If you’re anything like me, your choice isn’t always (i.e.: hardly ever) healthy. 

In an effort to correct that situation, I decided to buy a bag of trail mix. While looking at the vast variety of mixes on my grocery store shelves, I had a revelation: Most of the ingredients I like in a trail mix were already in my home pantry.

 
So I tossed together peanuts, walnuts, pistachios, dried cherries, dried cranberries, raisins,
and dried apricots. Then I added some dark chocolate chips…those are good for you, right?  Then I dumped the whole mixture into glass jars to keep on hand when the snack gremlins pay a visit.


What are your must-haves in a trail mix? 

Or do you have a different go-to snack?
Healthy or not?


Wednesday, July 20, 2016

White Chocolate Chip Lime Cookies


In my mind, summer and limes make a perfect pair. Perhaps my way of thinking comes from my childhood when Mom would take my sister and me to a local drugstore that still had a soda fountain (and an amazing penny candy display!) We would order limeades, made with fresh squeezed limes, simple syrup, and soda water. These beverages were nowhere like the ones you occasionally find today made by adding limes to lemon-lime soda. These were made in the style of lemonade using limes instead…the perfect remedy for a sweltering Midwest summer day.

 I wanted to celebrate limes this summer, but this time in cookie form with these White Chocolate Chip Lime Cookies. The recipe is a twist on a Lemondoodles one I created a few years ago.

The lime flavor pairs nicely with the white chocolate chips. I also like how the pecans help balance the sweetness of the chips and the tartness of the lime, but you could leave them out if nuts in cookies aren’t your thing.

White Chocolate Chip Lime Cookies
Makes 3 1/2 dozen

1 cup butter, softened
2 cups granulated sugar
1 teaspoon vanilla
2 large eggs
3 teaspoons lime zest
2 tablespoons lime juice
3 cups all-purpose flour
1/2 teaspoon salt
1/2 teaspoon baking powder
1/4 teaspoon baking soda
1 cup white chocolate chips
1 cup chopped pecans

Preheat the oven to 350 degrees F. Line two baking sheets with parchment paper and set aside.

In a medium-sized bowl, sift together the flour, salt, baking powder, and baking soda. Set aside.

In the bowl of a mixer with a paddle attachment, cream together the butter and sugar until fluffy. Add the vanilla, eggs, lime zest and lime juice until blended, occasionally scraping down the sides of the bowl with a spatula. Slowly stir in the powdered ingredients until they are just blended. Fold in the chips and pecans.

Roll the cookie dough into 1-inch balls. Place 1 1/2-inches apart on the baking sheets. Bake for 9 to 11 minutes, or until the cookies just begin brown on the bottom. Don’t over bake. Cool on the baking sheets for 2 minutes, and then finish cooking on a rack. Store in an air-tight container. 


Thursday, June 30, 2016

Kicked-up Burgers for Summertime


Whenever a summer holiday comes along, my first craving is for a hamburger. (With a hot dog not a too distant second. Okay, I’ll admit to having one of each!) Did you know Americans eat about 14 billion burgers each year? I guess I’m not alone in my craving for this meat patty on a bun.

If you’re having guests over to celebrate the holiday, consider setting up a hamburger and hot dog bar. Then everyone can have fun trying out different flavor combinations on their meat of choice. Cook up some hot dogs and hamburgers, and then set up a condiment bar so people can choose their own toppings. (You may want to hold a fun contest for the most creative hamburger and hot dog, with prizes.) Also, condiment combinations, such as how to make a Chicago Dog, can be printed and framed to set on the bar, or written on a chalkboard.

Here are some hot dog and hamburger bar suggestions:
  • Regular and poppy-seed hot dog buns
  • Regular and onion hamburger buns
  • Ketchup
  • Mustards, yellow and brown
  • Barbecue sauce
  • Mayonnaise
  • Salsa
  • Sweet pickle relish
  • Dill pickle slices
  • Dill pickle spears
  • Diced onion
  • Sliced purple onion
  • SautĂ©ed onions
  • Banana pepper slices
  • Jalapeno pepper slices
  • Sauerkraut
  • Tomato slices
  • Lettuce leaves
  • Chili
  • Coleslaw
  • Crispy bacon, sliced and crumbles
  • Nacho cheese
  • Blue cheese crumbles
  • Sliced American, cheddar, and pepper-jack cheeses
  • Grated cheddar cheese

While I love a simple hamburger cooked with just a sprinkle of salt and pepper, once in a while I like to kick them up in flavor. I first came across this recipe in a diet book, of all things. I’ve tinkered with it a bit. The original version of the recipe called for cilantro, but I like parsley better. But, if you’re a cilantro fan, by all means, give it a try. 


For other summertime holiday recipes, check out the links on this blog post from last year!


Kicked-up Burgers
Serves 4

1 1/2 pounds ground beef
1 tablespoon dried mustard
2 garlic cloves, minced
1 teaspoon cayenne pepper
1 tablespoon chopped fresh parsley
4 hamburger buns
Butter

In a large bowl, combine all the ingredients together, and then shape into patties. Cook the burgers any way you choose—on the grill, or with a broiler or skillet—to the desired doneness. (I love them cooked in my cast iron skillet!) While the burger cooks, spread butter on the cut sides of the hamburger buns. Toast them either on the grill, under the broiler or in a skillet. Once the burgers are done, place on a toasted bun and top with your favorite condiments.


Tuesday, June 21, 2016

Summer Veggie Succotash


Does anyone eat succotash anymore? Traditionally made with corn and beans (usually lima beans), this side dish seems a bit old fashioned…or it did until this recipe came along!

Succotash’s history reaches back to the early days of our country. A Native American stew made from corn, beans and a bit of meat, it was adopted by the early English settlers as a way to ward off starvation when other food sources weren’t available. Succotash was probably on the menu that first Thanksgiving in Plymouth, Massachusetts.  

Recently, the Kansas Museum of History featured an exhibition called What’s Cooking, Uncle Sam? The Government’s Effect on the American Diet. Created by the National Archives and Records Administration, the exhibit detailed the Government’s impact on how we eat every day, from what is grown on farms to recipes served on dinner tables across the country. It also explained how economic hardships, wars, and other historical events impact our food choices.

A cooking class was part of the exhibit, featuring recipes inspired by ones in Eating with Uncle Sam: Recipes and Historical Bites from the National Archives, which was published to go along with the What’s Cooking, Uncle Sam? exhibit.

The succotash recipe in the book was from an 1879 Army cooking manual and called for the cooked vegetables to be made in a cream sauce. My mom told me that is how she remembered it being made, but growing up we often had corn (or hominy) combined with lima beans on their own and called it succotash. At least, that’s how I remembered it.

At the cooking class, dietician Amber Groeling came up with a modern-day version that works both as a side dish or a main course. Her version added many more vegetables, swapped the Lima beans with shelled edamame, and dressed it with fresh basil, olive oil, and tarragon vinegar. 


Since tarragon vinegar isn’t something I keep around, I swapped it for red wine vinegar. I also upped the amount of bacon from 2 slices to 3 for more flavor, and used cherry tomatoes instead of one whole tomato. That’s what is great about this recipe…you can tinker with it to fit your own tastes very easily. Soon I plan to try it with lima beans instead of edamame.


I enjoy this succotash as a one-skillet supper on warm summer evenings, but it would also work well as a side dish to grilled or barbecued meats. You can make it a vegan dish by skipping the bacon and using olive oil instead. It tastes wonderful both served warm or at room temperature.  

Summer Veggie Succotash       
Serves 6

3 slices bacon
1 medium yellow onion, diced
1 12-ounce package of frozen corn, defrosted
2 cups zucchini in 1/2-inch dice
2 cups yellow squash in 1/2-inch dice
1 12-ounce package frozen shelled edamame, defrosted
1 cup cherry tomatoes cut in half
3 tablespoons red wine vinegar
3 tablespoons extra virgin olive oil
Salt and pepper to taste
1/4 cup fresh basil, cut into thin ribbons.

In a 12-inch skillet, cook the bacon until crisp. Set the cooked bacon aside. Into the skillet in the hot bacon fat, add the onion and cook until translucent, about 5 minutes. Next, add in the corn, zucchini and squash. Cook until the zucchini and squash start to become tender, about 5 to 10 minutes. Add the edamame, cook until warmed through. Chop the crisp bacon and stir into the mixture, along with the sliced tomatoes. Turn off the heat and add the vinegar, oil, salt, pepper and basil. Adjust seasonings to taste. Serve warm or at room temperature.


Tuesday, June 7, 2016

Greek Salad Turkey Wrap


In much the same way my body and spirit crave comfort foods in colder weather (mac and cheese, pot roast, hearty soups), the longing turns to fresh veggies and fruits as the temperature rises. Maybe it’s the plethora of fresh produce at the farmers market and grocery store? Maybe it’s just the heat? For whatever the reason, my crisper drawers and hanging wire baskets are bursting with freshness.

This Greek Salad Turkey Wrap is a wonderful way to pack a lot of veggies into one meal. It's based on a sandwich I always order at a local coffee shop. It makes a great sandwich for a picnic, lunch at work, or a light summer supper. There are no exact measurements with this recipe since everything can be added to fit your personal tastes. Just be sure to not overload the wrap or you’ll have trouble rolling it all up. 

To be honest, I’m terrible at filling a wrap. I always put in too much.

Greek Salad Turkey Wrap
Makes one sandwich

1 wrap (I like spinach wraps.)
1 to 2 slices deli turkey
Mixed greens
Feta cheese
Red onion, thinly sliced
Sliced olives
Cucumber, thinly sliced
Tomato, thinly sliced
Radishes, thinly sliced
Greek salad dressing (I found this in the produce section of the grocery store.)
           
Lay the wrap on a flat surface. Layer on the remaining ingredients. Roll up the wrap, cut in half, and enjoy.